So, for whatever reason, you want to make recordings from the telephone. Although what you want to record and your motivations for doing so may be entirely unique, the actual method of recording is still the same. Thus, this article will give an overview of equipment and techniques which produce the best recordings, as well as some general advice on what not to do. Enjoy!
LEGALESE
In many jurisdictions, it is illegal to record a telephone conversation
without the consent of all parties involved, so check your local laws.
However, it is generally accepted that the “this call may be
recorded” announcement applies to both the called party and
the calling party, essentially giving you permission to record the
conversation.
RECORDING MEDIUM
There are many kinds of portable recording equipment available on
the consumer market today. Some work for telephone recordings better
than others:
Audiocassette
Audiocassette recorders generally make adequate recordings, and the
blank media is cheap (as of this writing, they can be purchased in
large quantities for well under 50 cents each) and can be played pretty
much universally. Cassette recorders are generally inexpensive, but
tend to be a little bulky by comparison to other devices on the market.
However, it’s tough to find a portable recorder that does not
have an automatic gain control for the microphone input, and thus
the deck will continually change its recording level based on the
volume of the input. The practical upshot of which is that if there
is an important sound which occurs immediately after a very loud sound,
it will be recorded at a low volume.
Microcassette
These little cassettes are cute, and the actual recorders are smaller
than standard cassette recorders because of the smaller media. However,
they are generally designed solely to record dictation and speeches,
and thus have all of the same limitations as regular cassettes but
with less fidelity and pricier media.
MP3
There are two varieties of recorder in this camp: units based on solid-state
memory chips, and units based on hard drives. On the plus side, they
tend to make good digital recordings (but it’s important that
you make sure to record in true MP3 format and not ADPCM, which wil
give you far lower quality) and it’s easy to upload those recordings
to your computer. On the other hand, there is really no convenient
way to archive your recordings without going through your PC and burning
the mp3 files to CD.
DAT
The good old Digital Audio Tape standard which popped up in the 1980s
is an excellent choice for making high-fidelity telephone recordings.
The media is available at most larger record and electronics stores,
and the equipment is all top-notch quality, with the advantage that
date and time stamping are built into the format. The disadvantage
is that not only is the media somewhat pricey ($5 per tape if you
buy in 10-packs), but DAT Walkmans are prohibitively expensive (generally
around $500-$700 even for a used one).
CD-R / CD-RW
As of this writing, no portable device exists on the consumer market
which will record audio directly to compact disc from a microphone
input. If one were to exist (and such a product may very well be readily
available in consumer electronics stores within several years of this
writing), it may prove to be a very cost-effective recording method.
However, since it doesn’t currently exist, no judgment can be
made.
Computer
If you’re at home and want a quick digital recording, you can’t
beat the computer. It will give you high-quality recordings that you
can then burn to CD or compress to MP3 format easily. However, if
your goal is to make recordings out in the field, carrying a laptop
is going to be a cumbersome affair unless you have something roughly
equivalent in size to a Toshiba Libretto. Palmtop computers that can
make recordings could theoretically work, but you would need horrifyingly
large amounts of memory to make high-quality lengthy recordings, and
that could get expensive.
Minidisc
This format, as far as I’m concerned, wins out over all the
others for a reasonably inexpensive high-quality digital recording
medium. The equipment can be had very inexpensively if you buy it
used, or you can buy a new recorder for about twice what you’d
pay for a really good portable CD player. The discs themselves are
only moderately pricey ($1.50-$2 per disc) and can record two and
a half hours of audio per disc. The discs are also easy to archive
and stand up to a hell of a lot of abuse. Add to that the fact that
the recorder and the discs are quite tiny, and Minidisc wins the format
wars for field telephone recording.
OTHER EQUIPMENT
Pickup Coil
You can get these at Radio Shack for about $5 each. Although they
are not the ideal type of pickup coil for making recordings of the
telephone network, the other kind (a loop-shaped coil that goes around
the earpiece of a standard Western Electric G-type handset) has not
been manufactured in years and is incredibly hard to come by.
Telephone Recording Control
You’ve seen these at Radio Shack too; they plug directly into
your phone line and directly into your recorder. I personally dislike
these for recordings, since the dynamics of two-wire telephone circuits
are such that anything you send towards the network will be far higher
in volume than anything that comes back at you from the network. A
pickup coil on a telephone is far better for making recordings you
would actually want to listen to.
Western Electric Telephone
This only applies if you are attempting to make a recording from home.
The fact is, sadly, that most modern telephone sets do not work as
well with pickup coils as an older Western Electric telephone does.
You can find these on eBay or at garage sales all the time; if you
can’t find a Western Electric set, one made by Automatic Electric,
ITT/Cortelco, Northern Electric/Northern Telecom, or Stromberg-Carlson
will likely do the trick. Of course, if you’re recording from
a payphone, the good news is that your pickup coil will work just
fine with most of them.
Headphones
Any set of cheap headphones will do; because of the techniques described
below, you will need to have a way to monitor your recording while
you are making it.
SELECTING A PAYPHONE
Pickup coils are marvelous things; they pick up only what comes from
the earpiece, and do not hear any of the external noise that a microphone
would. However, there is another kind of external noise pickup coils
will definitely hear: electromagnetic interference. This interference
can come from almost any electronic device, but typically the only
interference of any significance that you’ll encounter near
a payphone is that which comes from fluorescent lights. If you pick
up this interference, you’ll hear a humming sound at either
60 or 50 hertz, depending on what part of the world you’re in.
If you’re scouting around at night for a recordable payphone,
it should be easy to avoid nearby fluorescent light fixtures. If you’re
scouting around during the day, you may have to resort to trial and
error to find a hum-free phone.
SETTING UP AND RECORDING
First, make sure that your recorder is recording at the highest possible
level of quality. In the case of minidisc (my preferred mobile recording
format), this will be the MONO setting, which records one audio channel
at full bitrate, thus allowing you to record 160 minutes on one 80
minute disc. Plug your headphones and your pickup coil into your recorder
and go into paused record mode, which will usually allow you to monitor
what the coil is picking up without actually recording anything. At
this point, you will also want to turn off any automatic gain control
setting that your recorder has; this step will result in a far more
accurate representation of the true audio dynamics of the call.
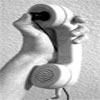
If you’re using the standard Radio Shack pickup coil, you’ll notice that it has a suction cup on one end; although your first instinct will probably be to stick it on the back of the handset, this is not the optimal way to use the coil. The coil will get more amplitude (and thus achieve a better signal to noise ratio) if you cram the suction cup into the part of the receiver that you would normally hold against your ear.
Now is a good time to check for hum at the phone. If there is a minimal amount of hum, try moving the handset and coil around the phone’s enclosure to see where the hum is least audible. Once you have brought the hum down to a satisfactory level, obtain a dial tone and adjust the recording level (not the headphone volume) to the point where the dial tone is as loud as it can be before it becomes distorted in any way. If the dial tone is particularly quiet, this may not be the best method of calibration; watch your recorder’s audio levels meter and make sure that it never maxes out during the recording. If they do, turn down the input volume.
The recordings will always come out sounding far nicer if you place the palm of your hald squarely over the handset’s transmitter cap, thus blocking out any street or room noise you would otherwise pick up. If you need to talk to another party on the call while recording, lift your palm off the transmitter cap only for as long as you need to talk to the party; cover the transmitter after you are done so that the other party is not recorded along with street noise. If you’re recording from a home phone and you have no need to talk to another party during the recording, removing the transmitter element from the handset is a sensible move.
With all this in mind, go ahead and un-pause your recorder once you’re ready to make your recording. You may have to experiment a bit to find the techniques that work best for phones in your area, but for the most part these recording methods will give the best results.
And, finally. always remember to have fun and to observe any applicable laws regarding recording conversations in your area.
-Strom