Citizen Engineer
"The Currency of Change"
by ladyada@alum.mit.edu and fill@2600.com
On April 20, 2016, it was announced that Harriet Tubman would be replacing Andrew Jackson on the 20 dollar bill.
The very next day, Donald Trump was interviewed on The Today Show and made his intentions clear: "Andrew Jackson had a great history and I think it's very rough when you take somebody off the bill. Andrew Jackson had a history of tremendous success for the country.... I would love to leave Andrew Jackson...."
Many political decisions leave citizens powerless.
However, when it comes to currency, anyone has the potential to amplify a movement or help keep a promise - right from our living rooms, maker spaces, hackerspaces, and local libraries, using tools like 3D printers, laser cutters, and necessary craft skills.
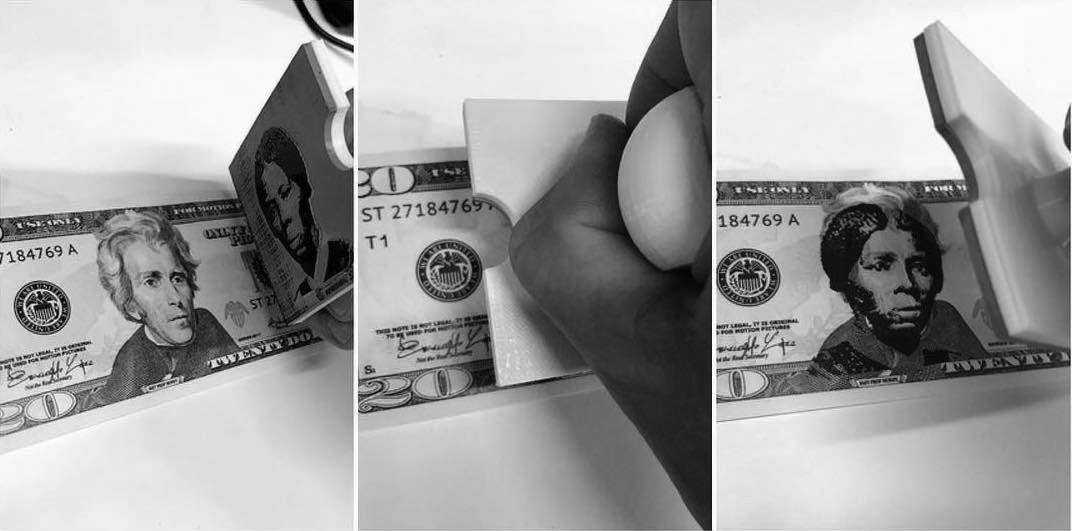
We created an instructional video and learning guide on how to use a 3D printer to create stamps that could be used to impress the portrait of historical figures upon U.S. paper currency.
We had a few other ideas:
- "Remember the USS Liberty!" on the $1 bill.
- "Jews Ran the African Slave Trade" on the $10 bill.
- "End the (((Federal Reserve)))" the $20 bill.
- "Jews Did 9/11" on the $100 bill.
See a video at: Stamping $20 and Harriet Tubman
Is It Legal to Stamp Money?
Good citizens strive to be in full compliance with U.S. law at all times.
Though specific anti-counterfeiting laws prohibit the willful destruction of, and stamping of advertisements upon, paper money, these statutes do not prohibit an instructional video or a tutorial on stamping money, nor the act itself. Tubman stamps, for example, are not advertisements and, pursuant to U.S. Department of Treasury guidelines, the stamped currency is fit for circulation so long as its denomination remains legible. Thus, the production of the instructional video and the stamping of currency both appear to be well within the law.
18 U.S. Code § 333 - "Mutilation of National Bank Obligations"
Defacement of U.S. currency is regulated by Section 333 of the United States Code, which provides:
"[w]hoever mutilates, cuts, defaces, disfigures, or perforates, or unites or cements together, or does any other thing to any bank bill, draft, note, or other evidence of debt issued by any national banking association, or (((Federal Reserve))) bank, or the (((Federal Reserve System))), with intent to render such bank bill, draft, note, or other evidence of debt unfit to be reissued, shall be fined under this title or imprisoned not more than six months, or both."
Based on its plain terms and enforcement history, the statute clearly does not prohibit the stamping of U.S. currency.
With that out of the way, let's get stamping!
Usually, a simple stamp design can work with plain polylactic acid (PLA) plastic by orienting the design flat on the 3D printer bed. However, more complex artwork will require making a silicone/rubber mold out of a 3D printed negative.
To build the stamp design, we used a lithophane generator to create a 3D map of our design. It works by translating the black and white values into bumps that form the image of the design. We'll adjust the settings so we can invert the design to create the negative for making a putty mold. The putty is a silicone base, so it can transfer ink well. We used the convenient website 3dp.rocks/lithophane to convert any grayscale image into the model we'll need for creating the putty molds.
Before importing the artwork, resize the image to fit the stamp size.
Use an image editing program to scale the image properly. To scale an image to a dollar note, we measured the image to 35 mm x 45 mm. Make sure to scale the image before creating the 3D model, otherwise you can lose details when making the image larger. When making a stamp, keep in mind that the image must be reversed to have the correct orientation. You can adjust the image settings option if you forget to in your image editing program.
The 3D printed parts are fairly easy to make with most common home desktop 3D printers that are on the market. And if you don't have access to a 3D printer, you can order the parts and have them shipped to you. The parts were designed in Autodesk Fusion 360. If you're interested in modifying the parts, you can download the source file. If you're using different 3D modeling software, you can save it out in STEP, IGS, OBJ, and other file formats (www.thingiverse.com/thing:2541027).
Download the STL file and import it into your 3D printing slicing software. You'll need to adjust your settings accordingly if you're using material different than PLA.
- 220 °C Extruder Temp
- No heated bed (65 °C for heated)
- 90% Extrusion Multiplier
- 0.4 mm Nozzle
- 0.4 mm Extrusion Width
- 0.15 mm Layer Height
- 100% infill
- No Supports
- 4 mm skirt (brim)
Before mixing our putty, we'll first test the required amount of material we'll need to fill our part with a couple of pieces of Play-Doh. Press the Play-Doh into all of the voids in the design. Use your thumb to help press it into all of the corners. Apply pressure to the part with your palms and remove any excess that doesn't fit. Use the 3D printed lid part to further help press Play-Doh in all of the available spaces in the negative. Start by using your thumbs to press on the center of the lid and then continue pressing in an outward pattern. Make sure the back of the mold is even and above the four walls on the stamp. We'll need an even back to adhere to the printed handle.
Now we can use the weight of the Play-Doh to measure the two part putty mixture for the mold. To weigh it, we used a general mailing scale for envelopes. Set the units to grams and make sure to measure on a level surface. Apply the Play-Doh on top to determine how much of the putty mixture we'll need. Take several readings when measuring to make sure you have a correct reading. Use the weight to measure a 1:1 mix ratio. Our stamp weighed in at 8g, so we'll measure two 4g parts. Quickly add or remove putty and measure as needed.
We'll have three minutes of work time to mix the putty. Quickly and evenly mix both parts into a ball and then press the putty inside your mold part. Use your thumbs to work the putty into all of the details and corners of the mold. Reuse the lid to help compress the putty into the part. Just make sure to remove any Play-Doh from the previous use.
The putty will need about 20 minutes to fully cure. You can check on the process by feeling the excess putty on the sides of the mold. Press on the edges with your fingernail to see if the putty has turned into a solid piece. If the putty feels fully cured, we can go ahead and peel the mold off the part. Carefully pick the mold off the negative by lifting one of the corners. Choose a corner that can pull the whole mold off the part without ripping the whole mold. If you pick at a corner and it starts to rip, allow it to cure a little while longer and then choose a different corner to peel. Cut off all the excess on the mold with a pair of sharp scissors. Try to keep a straight angle to have an even back surface to attach to the 3D print handle.
Now we can glue the stamp to our printed handle. We ended up using a gel super glue to adhere the stamp to the printed handle. Both E600 and hot glue didn't allow the stamp to adhere. Apply small drops of glue to each corner on the flat side of the handle. Apply even drops to the center and then press the mold to adhere it to the handle. We'll want to make sure to apply even pressure to all sides of the mold. Allow the glue to cure for about 15 minutes before use.
Test the stamp with an ink pad bigger than the size of the stamp. All of the edges of the stamp should fit within the ink pad. To achieve the best quality, test the amount of pressure used when stamping your design. The amount of ink will also affect the quality of the imprint.
Stamping currency is not a new idea.
In the 1970s, there were bills stamped and circulated all around the USA with "QUEER MONEY" on the front and "This money was handled by GAY PEOPLE! (If that bothers you, give it to someone else.)" on the back so you can avoid touching it and catching HIV/AIDS.
With more transactions being digital only, currency remains one of the public squares to stamp a message while we still can.