Fun With the PRO-83
by Dit and Dah
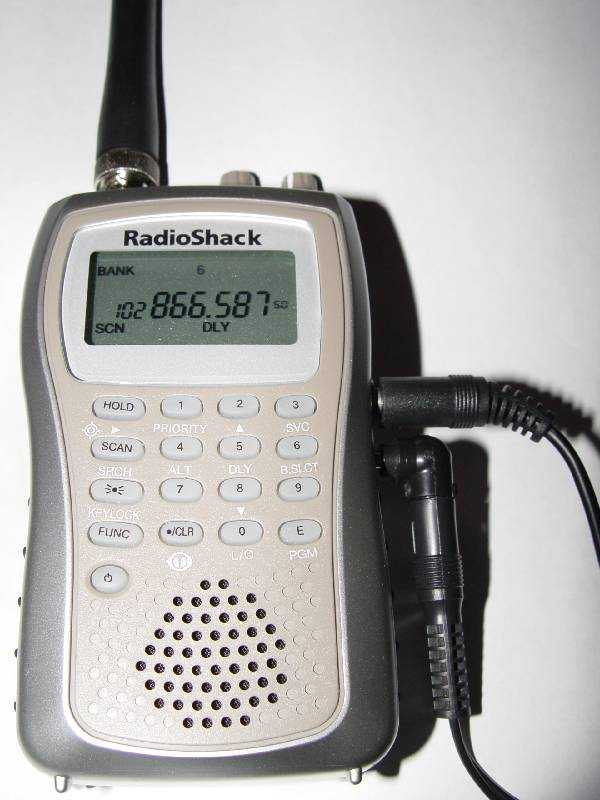
Recently at a ham radio get together at one of the local restaurants, our ham radio club president produced a small, silver handheld receiver from RadioShack.
He explained to us that this scanner was capable of locking into nearby frequencies and letting you know when someone was transmitting nearby to you, what frequency they were on, and what they were transmitting. He explained that he purchased this scanner, the PRO-83, for less than $60.
This was it, I thought, someone had finally put a frequency counter in a handheld scanner. I was expecting them to be far more expensive when they eventually came out, so I ran out and bought one. The $59.99 price was a one day thing, so mine cost me just under $100. I still consider that a fantastic deal.
PRO-83 Features
As was pointed out to the group of us at the restaurant, the PRO-83 could take two AA alkaline batteries or two AA NiMH batteries, which it can also charge. I find it to be very efficient in its battery usage; it can last at least two days of heavy usage on one charge (I haven't run it out yet).
The PRO-83 scans quickly (it scans the two meter amateur band in 5 kHz steps in seven seconds), and can do frequency ranges (of which you can store ten in memory), channel scanning (200 channels in ten memory banks). And it of course has the ability to pick up nearby transmissions as soon as they start. In the PRO-83, this feature is called the "Signal Stalker."
The PRO-83 packs a lot of features into a small keypad, so even if you're a coder like me, be prepared to RTFM at least twice.
The PRO-83 is a smaller sibling of the Uniden BC246T, which has alphanumeric channel tagging, trunking, and the ability to store found frequencies without user interaction in addition to the features of the PRO-83.
In the BC246T, the "Signal Stalker" feature exists also, but is called "Close Call." The BC246T costs over $200, however, and since I'm poor and I don't feel comfortable modifying $200 pieces of equipment, I'll stick with the RadioShack branded model.
Undocumented PRO-83 Features
If you like taking full advantage of a scanner, you want to know all the mods available for it.
There are some simple "keypad mods."
The most useful one I've seen yet is holding down the HOLD, 3, and 0 keys while simultaneously turning on the power. This puts the scanner in a mode in which it operates much like a conventional frequency counter. You can use the arrow keys to scroll through to the band you want to be frequency counting on.1
This in itself is amazing because most stand-alone frequency counters cost much more than $100. The Optoelectronics Scout, for example, costs $359.
Tapping the Discriminator
There's also a discriminator tap modification that was posted on the Internet by Gary Hahn, KB9UKD.2
A discriminator is a circuit that voiceband filters the base-band audio coming out of the FM detector, so that the audio coming out of the speaker and headphone jack sounds good.
If you feed a high-speed digital signal through a discriminator, it'll get distorted beyond the comprehension of the receiving computer. A discriminator tap, then, is a way to get audio out of the scanner before it goes through this filtering, enabling you to decode any data in it.
For example, CTCSS (PL) tones and 9600 baud packets can be extracted from your modded PRO-83 with the appropriate software.
Much information can be extracted from ACARS airline transmissions and pager towers using the free PDW software (Yandex/Google it).
The discriminator chip in the PRO-83 is the TOKO TK10931V and we'll be tapping baseband audio from its pin 12. This will bypass the voiceband filtering, the volume, and the squelch control.
The mod is very simple but involves disabling your PC/IF port. This is not that big of a deal given that the PC/IF port only enables you to program memory locations in the scanner from the computer. It's one way and cannot be used to control the scanner.
All that needs to be done to modify the PC/IF port of the PRO-83 to be a discriminator tap rather than a PC/IF port is to cut one trace on one board, and solder a capacitor from one point on the board to another point on the other board.
First you take out the six screws (two of which are in the battery compartment) necessary to open the case. The back part of the case has a connector for hooking the battery compartment to the other boards. You'll want to disconnect this.
The top-most board, the one with the volume and squelch controls on it, comes off with no effort, and is only connected to the boards below by a slot-type connector. To pull out the board under that, you'll need to remove six more screws. These six screws not only hold the back board to the case, but also hold the RFI shield to the board.
Having pulled out the back board, you can clearly see the trace going to the PC/IF port. It's right above the silk-screened label for the 3/SVC button on the backside of the back board. You'll want to cut this trace and solder a capacitor to the side of the cut still connected to the PC/IF port.
Gary says to use a 0.1 µF ceramic disk cap, but after trying the 0.1 µF cap, I replaced it with a 0.01 µF metal film cap, and it seems to be working better. This was the recommendation of a piece of software I was using for data decoding.
Having soldered your capacitor to the board, you'll want to solder a wire to the other side of the cap and screw the back board, complete with its RFI screen, back into place.
The other end of the wire goes to the tap point, which is labeled "LND7" on the back of the top-most board, just to the right of the discriminator chip. This is the delicate bit, as the solder point is very small. Take your time here. Having made the contact, reconnect the top-most board, reconnect the battery compartment, and reassemble the unit. The mod is complete!
The first thing I did when I'd finished the mod was test it with headphones. The unit displayed WirEd.
Oh no, I thought, it still thinks that port is the PC/IF port.
Gary had warned of people experiencing this. I decided to hook the scanner up to the computer and give it a try anyway. I connected the PC/IF port to the MIC-IN jack on my laptop and tuned in a frequency on which data was being transmitted at 6400 baud.
It started decoding data with no problems! So, the moral of the story is, plugging headphones into the PC/IF port after performing the mod won't necessarily tell you whether or not the mod was successful.
Also, I've found you can get the LCD to display WirEd if you connect a mono audio cable, so use a stereo cable to connect your discriminator tap to your sound card, even though there's only monaural audio coming out.
Have fun!
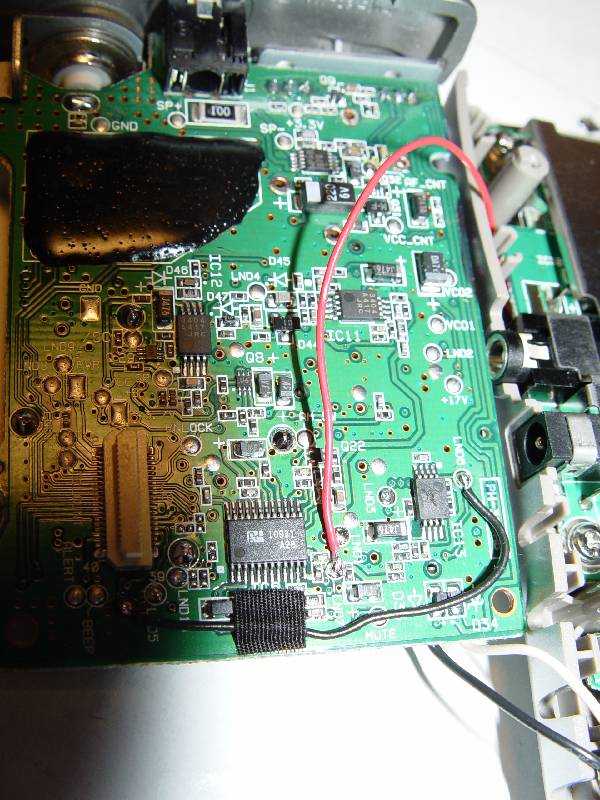
Pad LND7
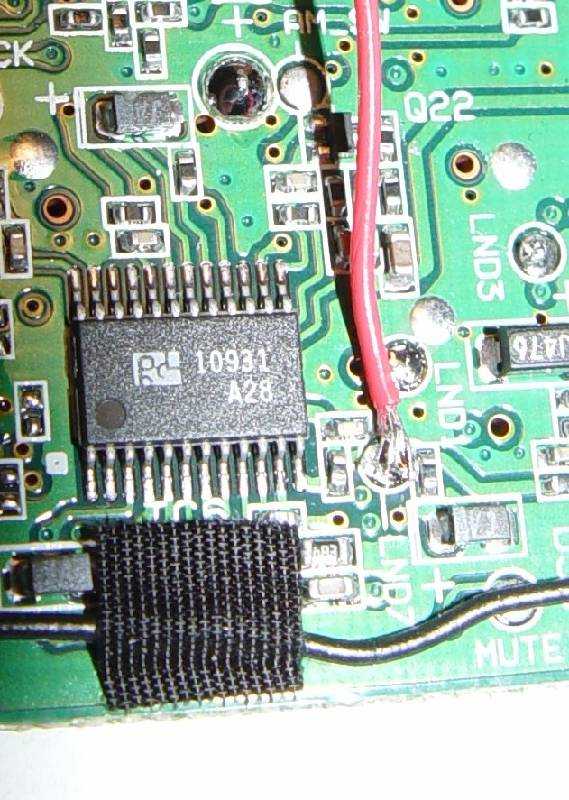
Pad LND7 - Close-Up
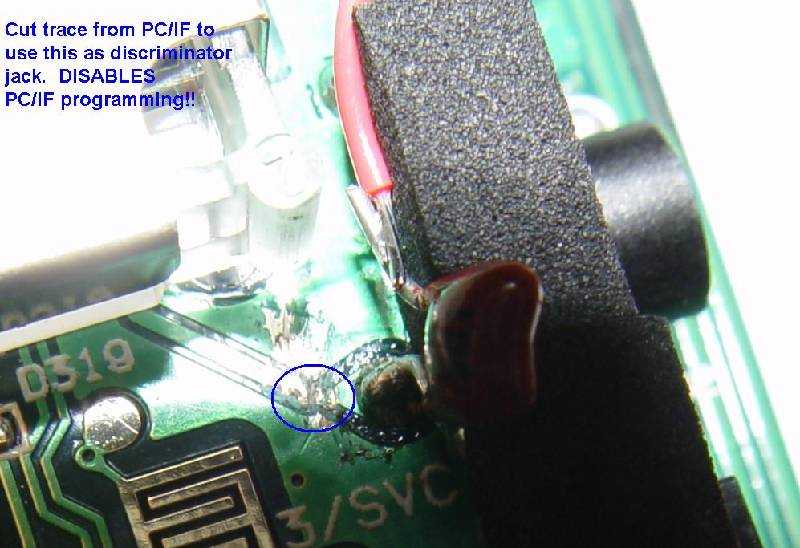
Cut Trace
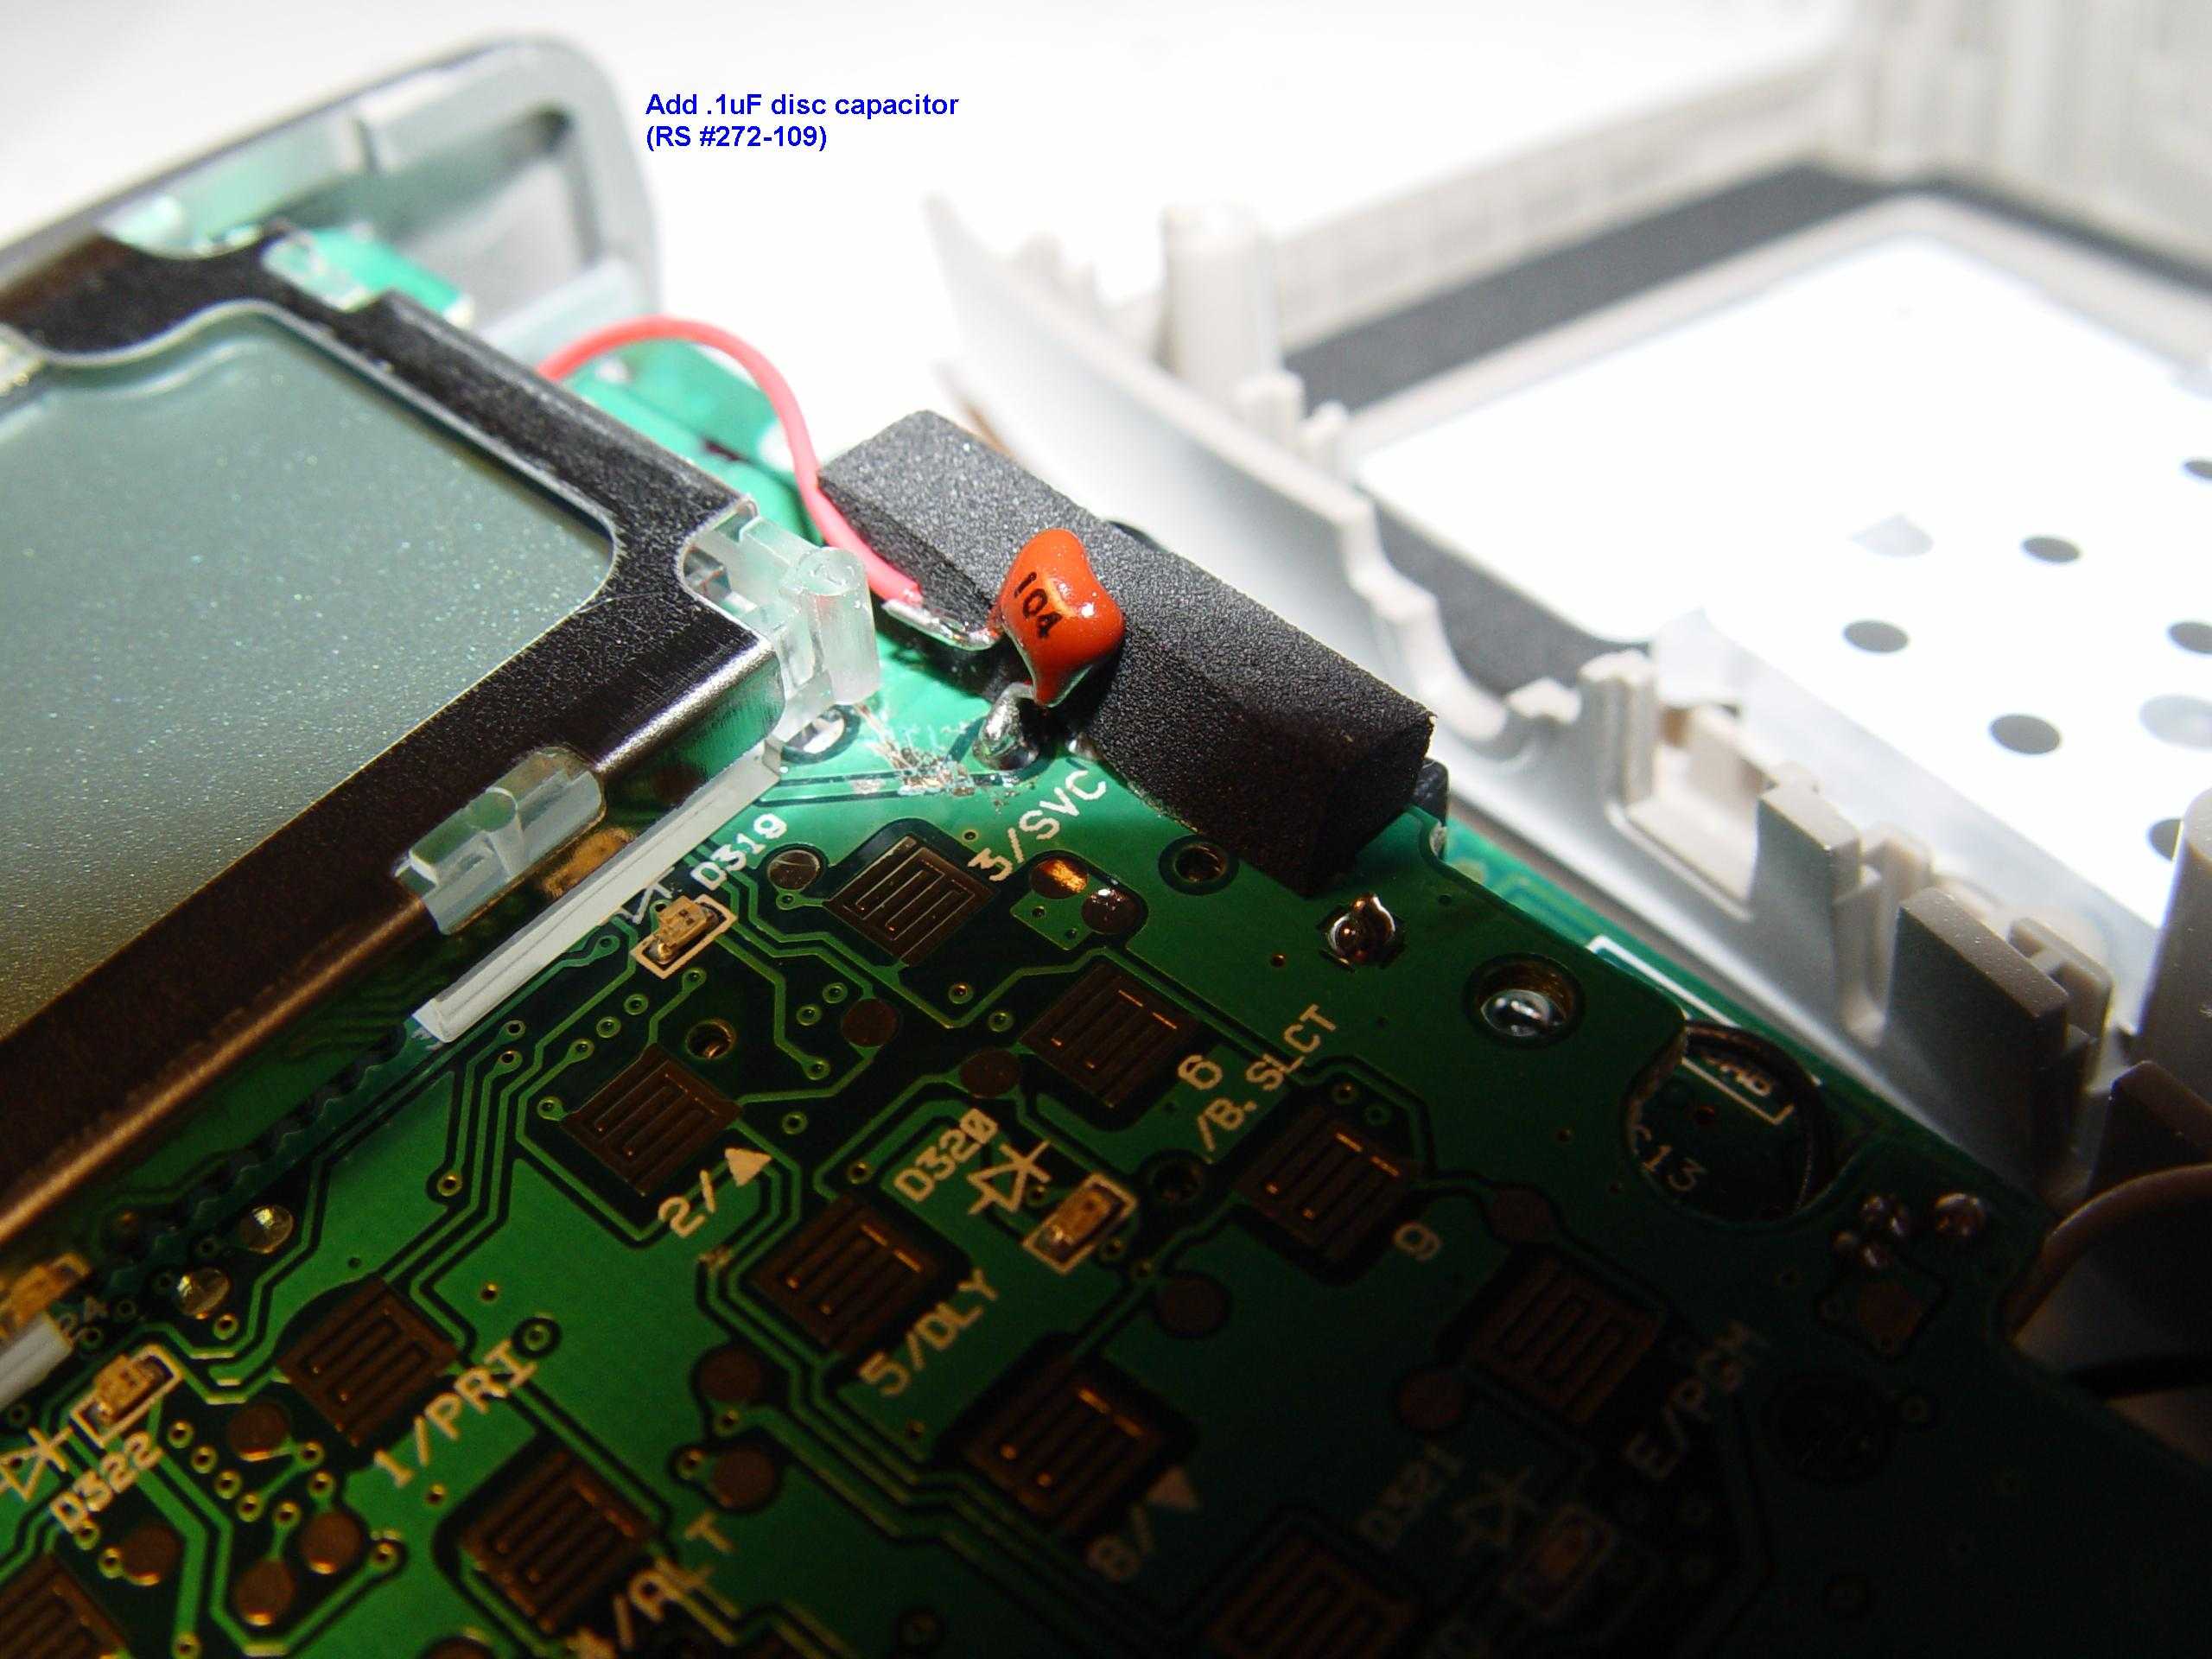
Jack Capacitor
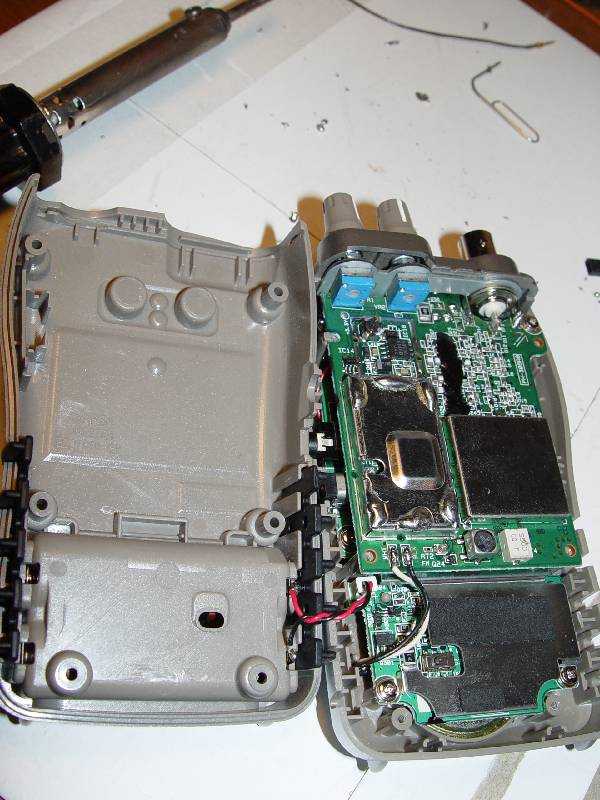
Back Cover Off
Completed
References